
Welcome to the whimsical world of Marketo's Email Templating Language! 🎉 If you've ever worked in Marketo as a marketer or developer you might be familiar with the unique syntax that makes up an email template in Marketo. This syntax goes beyond your standard HTML and CSS typically used to develop emails and provides a set of Marketo-specific class names, elements, variables, and other attributes that give marketers and developers alike the ability to create robust email templates that power all emails that get used in your email campaigns. At first glance, looking at the documentation for “marketo-izing” your email templates might appear a bit daunting, but no need to fret - the Marketo Templating Language gives you the tools to be both creative and precise. So, whether you're a coding newbie or a seasoned marketer, you're in the right place to unlock the magic of Marketo's email templates.
Why is Marketo's Templating Language Unique?
Marketo’s Email Templating Language (METL) is like a secret sauce that makes your emails not just functional, but fabulous! It’s specifically designed to give you control over your email design while keeping things simple. Think of it as a friendly mix between HTML and a dash of Marketo-specific magic. With METL, you have the power to create email templates that are flexible enough to accommodate your brand's unique flair, whether that’s sleek and professional or vibrant and bold.
Getting Started with METL: The Basics
So, you’re ready to dive into METL? Awesome! First things first, let’s talk about syntax. If you’ve dabbled in email HTML before, you’re already ahead of the game. METL builds on standard HTML but introduces a few custom classes, elements, and attributes that are exclusive to Marketo. Here’s a visual depicting the anatomy and hierarchy of the key components of a Marketo email template:
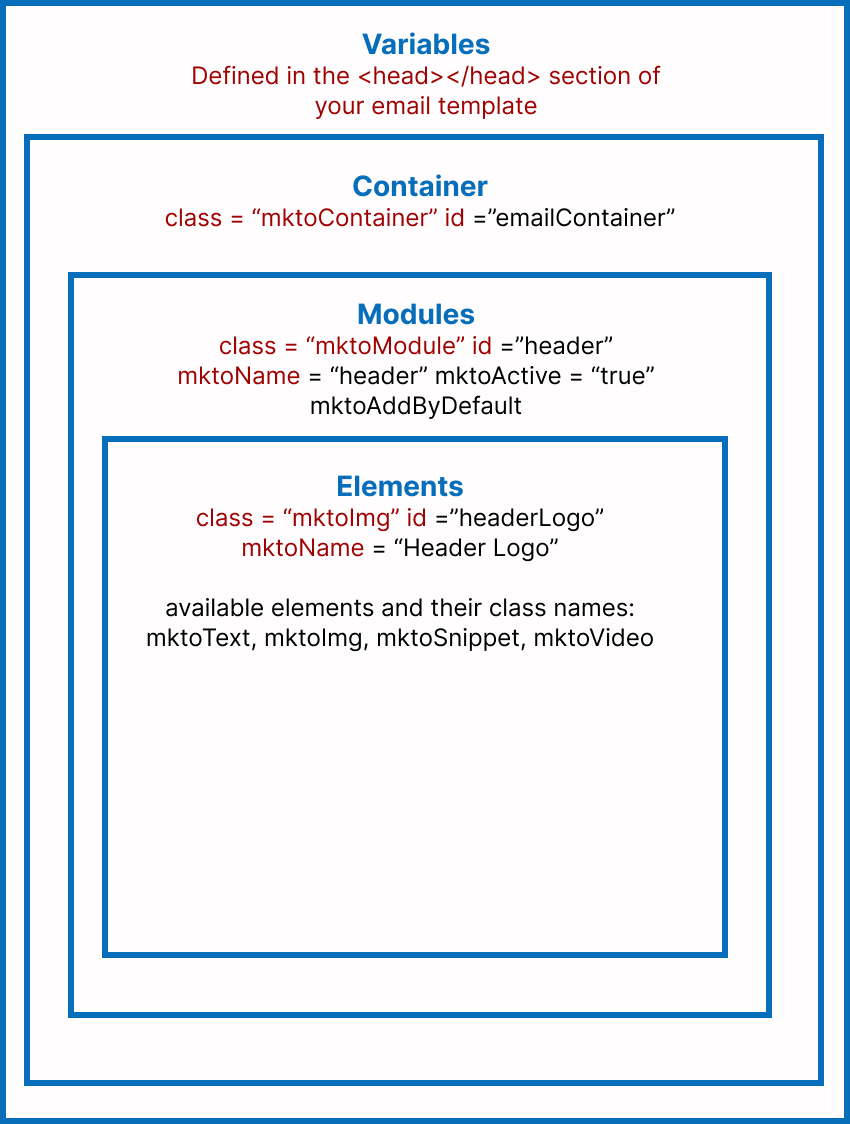
We will breakdown each component in the diagram below, please note everything in red is required in a Marketo email template.
Variables - Variables are the backbone of the design and flexibility of your email template. Variables are defined inside the <head></head> of your email template, before your CSS. These variables act as tokens defined using <meta> tags that you can use throughout the body of your template to define all kinds of styling you want in your email. In another blog post, we do a deep dive on how to approach your variables set up so I will skip that for now and stick to the technical implementation.
Similar to Marketo elements, there is a set list of available variable ‘types’ you can use, which you denote using a class=”” attribute, along with a required id and mktoName. What is really cool, is each of these types translate as a specific UI element for your end user when they go to build an email with a template. For example, mktoList displays as a dropdown menu, mktoColor displays as a Hex color code input field, along with a color picker - pretty awesome! There are a lot of optional attributes you can append to each variable type to make your template more robust, and I recommend checking out the Marketo documentation for a full list of these attributes. For this blog post, we will focus on the types/class names and a code sample of each:mktoString
<meta mktomodulescope="true" class="mktoString" id="button-link" mktoname="Button URL" default="http://mylink" />
mktoList
<meta mktomodulescope="true" class="mktoList" id="button-alignment" mktoname="Button Alignment" default="center" values="center,left,right" />
mktoNumber
<meta mktomodulescope="true" class="mktoNumber" id="button-top-space" mktoname="Button Top Space" default="20" min="0" max="45" step="1" />
mktoColor
<meta mktomodulescope="true" class="mktoColor" id="button-bg-color" mktoname="Background Color" default="#FFFFFF" />
mktoBoolean
<meta class="mktoBoolean" id="link_text_decoration" mktoName="Underline Link Text?" default="false" false_value="none" true_value="underline" false_value_name="No" true_value_name="Yes" />
mktoHTML
<meta class="mktoHTML" id="trackingPixel" mktoName="Add Tracking Pixel" />
mktoImg
<meta mktoModuleScope="true" class="mktoImg" id="hero-bg-image" mktoname="Background Image" default="http://library.marketo.com/rs/878-PHB-880/images/hero-bg-640x300.jpg" />
There are also 2 types of variables: global and local. Global variables get updated throughout your email, wherever you have them implemented. Local variables only affect the individual module styles. Here is an example of the local variable and global variable implementation:
Lastly, let’s show how these variables get implemented in the body of our email template:
Container - Or rather, THE Container, as there is only one defined in a Marketo email template. This is a crucial set up component to allow your template to function and be recognized as a Marketo template. The container is as simple as applying a class = “mktoContainer” and id = “yourIDName” to a <table>, <tbody>, <thead>, <tfoot>, or <td> within your template. Most likely it will go on a <table>, <tbody>, or <td> element. It is also important to note that this mktoContainer class denotes where you can drag and drop modules and should be placed on the opening element right before you define your first mktoModule. For example:
Modules - Modules are the building blocks of your email template, composed of different elements, and broken down sections that are nested directly within your container.
From a technical perspective, it is important to note that if you placed your class=”mktoContainer” on a table, tbody, thead, or tfoot element, i.e., <table class=”mktoContainer” id=”container” mktoName=”Wrapper”></table>, then each of your Marketo modules, which are defined using class = “mktoModule” id = “moduleId” mktoName=”moduleName”, must be specified using a <tr>, i.e. <tr class=”mktoModule” id=”moduleId” mktoName=”moduleName”></tr>. And if your container was placed on a <td> element, i.e. <td class=”mktoContainer” id=”container” mktoName=”Wrapper”>, then your Marketo Modules must be specified with <table> elements, i.e. <table class=”mktoModule” id=”moduleId” mktoName=”moduleName”></table>. An example of a module may look like this:
Elements - Elements are what make up modules and can be anything from text, to an image, to an html block. They are the editable regions of your email template and each element type has its own set of attributes you can apply to it to control how the end user can edit each one. These element types can be any one of the following:
Rich Text
Image
Snippet
Video
The Marketo documentation does a great job defining and explaining each element, so instead of repeating that documentation, I am going to provide example code snippets of each element and how they translate for the end user building an email:
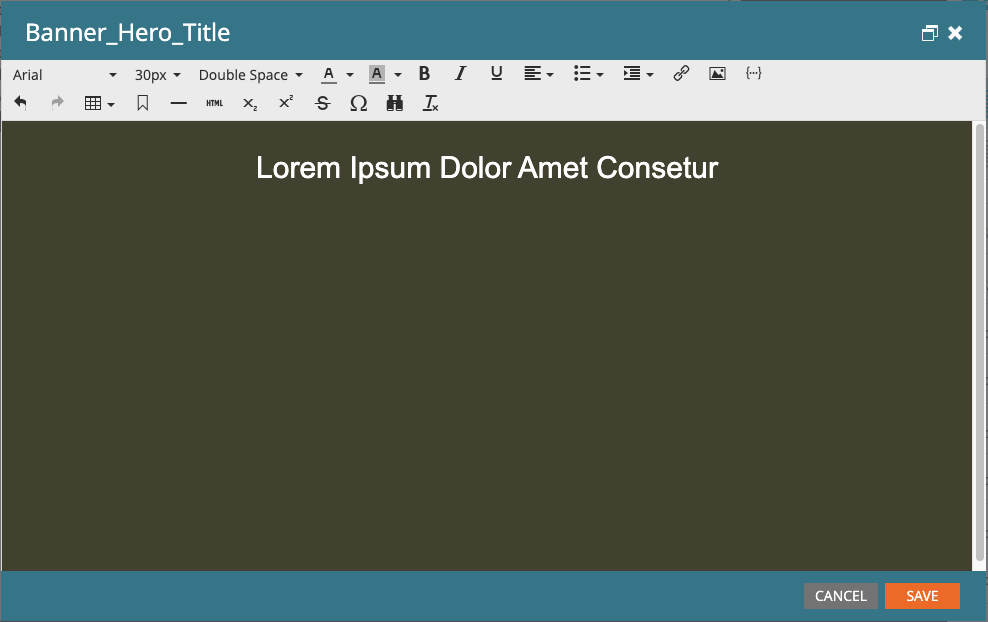
Rich Text
Element Code:
<h1 class="mktoText" mktoname="Banner_Hero_Title" id="hero-text">Lorem Ipsum Dolor Amet Consetur</h1>
Email Builder UI:
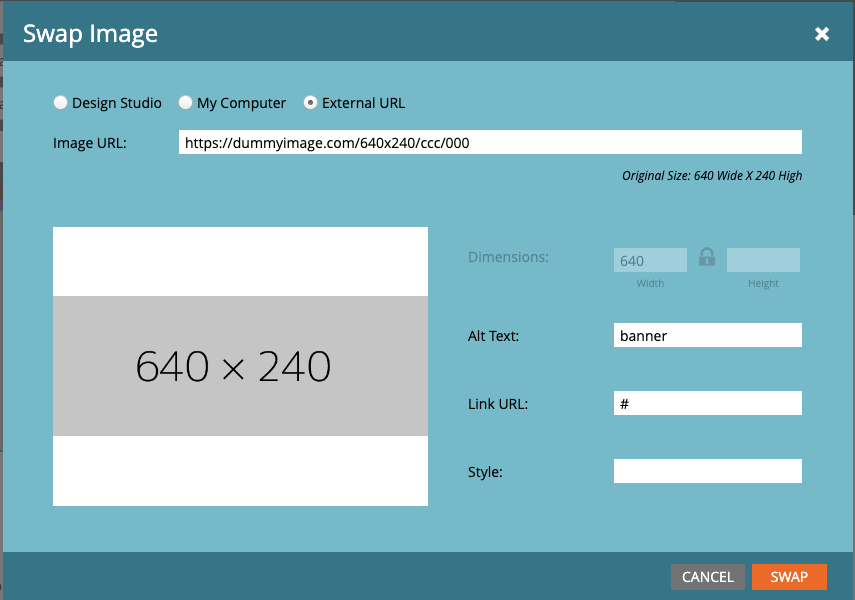
ImageElement Code:
<div class="mktoImg" id="Banner2" mktoName="Banner Image" mktoImgWidth="640" mktoImgsrc="https://dummyimage.com/640x240/ccc/000" mktoImgLink="#">
<a> <img alt="banner" border="0"/></a>
</div>
Email Builder UI:
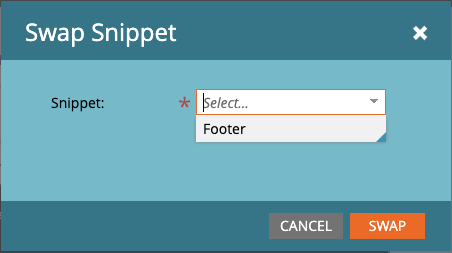
Snippet
Element Code:<div class="mktoSnippet" id="unsubscribeFooter" mktoName="Unsubscribe Footer" mktoDefaultSnippetId="12"</div>
Email Builder UI:
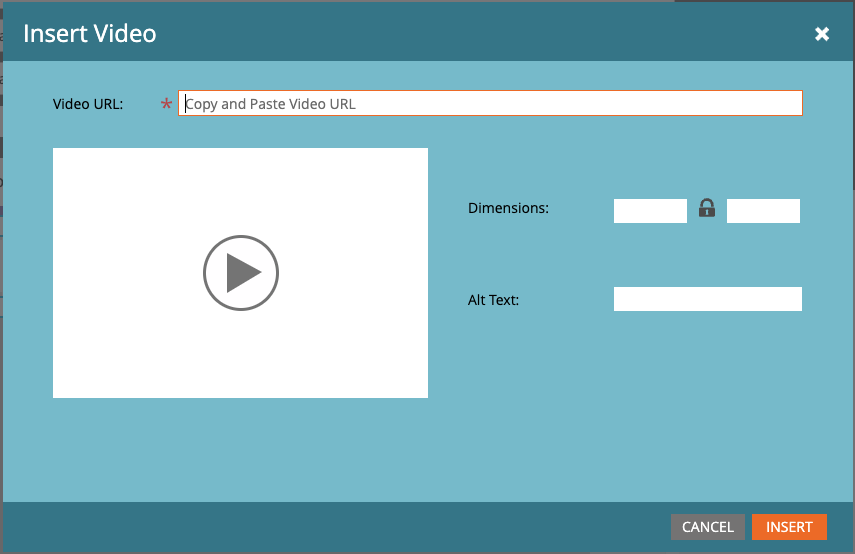
Video
Element Code:
<div class="mktoVideo" id="productVideo" mktoName="Product Announcement Video"</div>Email Builder UI:
Tips for Mastering METL
Start Small: Begin with a simple template and gradually add more elements as you get comfortable.
Experiment: Don’t be afraid to try new things. METL is flexible, so play around with different layouts and designs.
Test, Test, Test: Always preview your templates in Marketo’s editor or within EmailVariant to ensure everything looks just right before sending.
Wrapping Up
Marketo’s Email Templating Language might seem a bit intimidating at first, but once you get the hang of it, you'll wonder how you ever lived without it. Whether you're crafting a one-off campaign or building a reusable template library, METL empowers you to create emails that are as dynamic and unique as your brand. So go ahead, have fun with it, and watch your email game soar to new heights! 🚀
This guide should get you started on your journey to becoming a Marketo email template maestro. Happy templating!